Airsmart WiFi
The Airsmart WiFi product group covers all Wi-Fi connected AirSmart devices. Every variant shares the same body, TFT LCD display and installation process, so once you have done one, you have done them all. They differ only in which sensors they carry.
Devices in this group
| Variant | Model | Measurements |
|---|---|---|
| S | AirSmart Edu | Temperature, humidity, CO₂, light, sound |
| C | AirSmart CO₂ | Temperature, humidity, CO₂ |
| N | AirSmart NOX | Temperature, humidity, CO₂, nitrogen oxides (NOx), VOC |
| H | AirSmart Home | Temperature, humidity |
| F | AirSmart HCHO | Temperature, humidity, formaldehyde (HCHO) |
| P | AirSmart PM | Temperature, humidity, CO₂, particulate matter (PM) |
The variant letter is the first character of the device code on the label (for example an S... code is an AirSmart Edu). For the full sensor list per model, see monkeytronics.co.nz.
This group is the current TFT-display generation. It is separate from the older matchbox-sized Sensor Node devices, which are not covered here.
The device at a glance
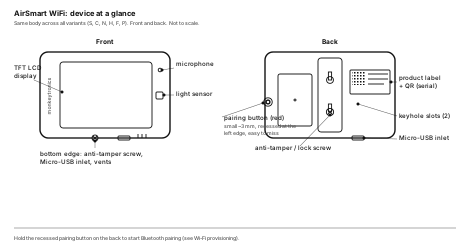
The recessed pairing button on the back is the one you hold to start Wi-Fi pairing. The QR code on the label is what you scan to register the device.
What's in the box
- The AirSmart WiFi device
- A Micro-USB cable and wall charger
- Two mounting screws
- A quick-start card with the QR code
Before you go
Take these to site:
- A phone with the Airsmart Installer app installed and signed in, with Bluetooth and camera on.
- The site's 2.4 GHz Wi-Fi name and password (see Network requirements).
- Fixings: the two supplied screws plus wall plugs for the wall type.
- Cable management: 20 mm conduit or clips, and something to cover the switch.
- The usual hand tools: drill, level, screwdriver, pencil.
The install sequence
Work through the guide in order:
- Set up the site - sign in and create the location once (details, network, floor plan).
- Mount and power - placement, mounting and power for each device.
- Register and connect - scan, customise and connect Wi-Fi, in the app.
- Hand over - transfer the whole site to the owner.
- Troubleshooting - fixing common issues.
The Monkey-recommended flow
For a site with several devices, do the app work in comfort first, then just mount and photograph on your feet.
At a desk, power up all the devices together and register, name and connect them one after another. The app remembers the Wi-Fi network for an hour, so you enter the password once for the whole batch.
Then go room to room: mount and power each device (it reconnects to the Wi-Fi on its own) and photograph where it is.
You do all the scanning and typing sitting down, and the only work on your feet is mounting and a quick photo. Name each device for its room as you go, so you know which one goes where.
For one or two devices, the plain device-by-device order (mount, connect, photograph, repeat) is just as good.